1.2. Project Detail
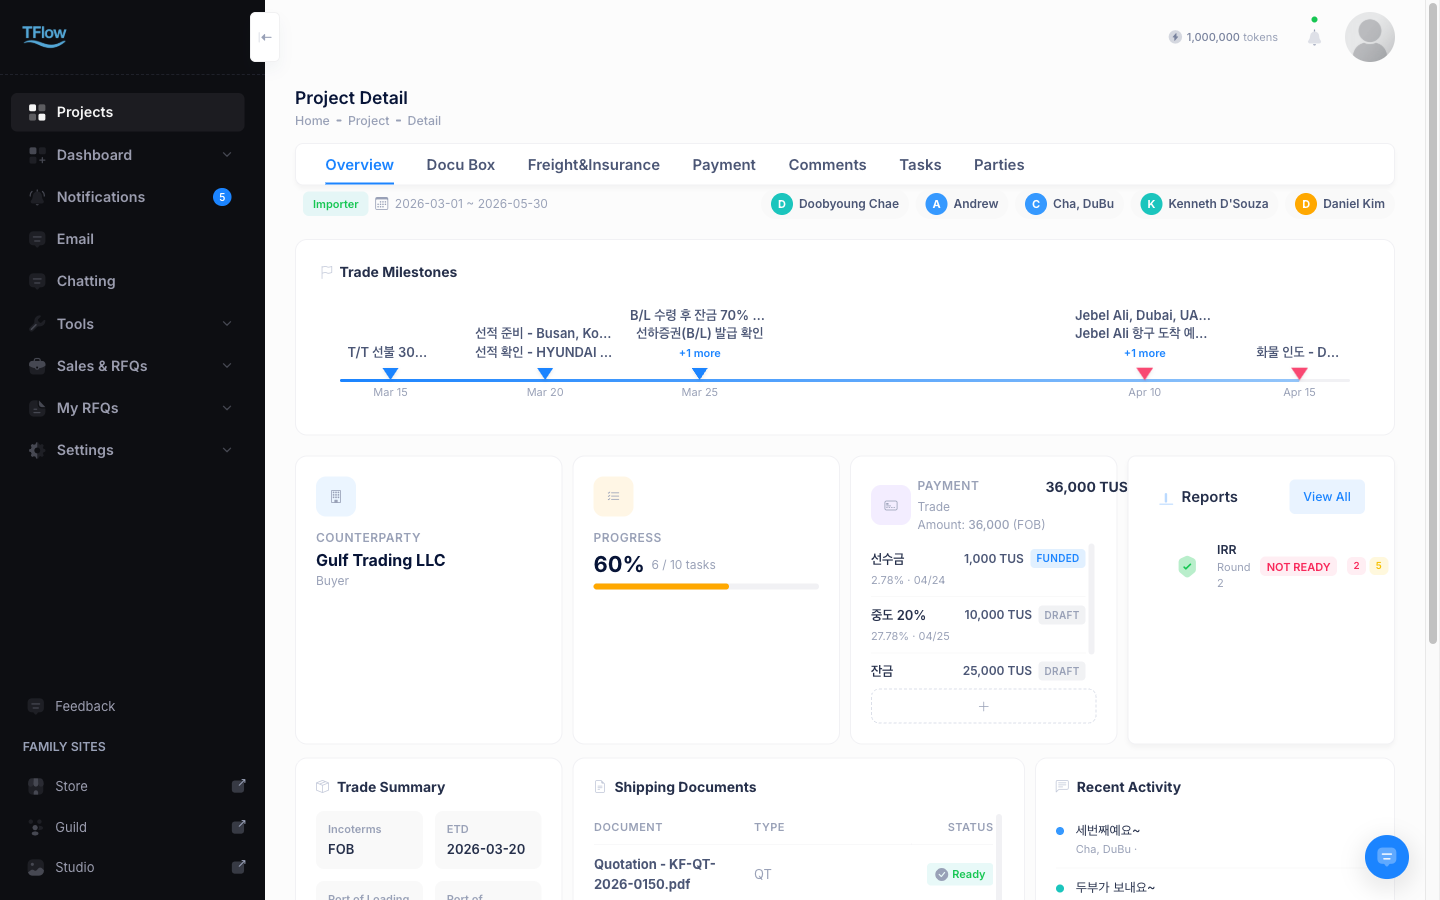
The project detail page is a role-based dashboard. The screen adapts to whether you are the exporter or the importer, so you can grasp the transaction progress at a glance.
💬 Try it with Lyra
- "Tell me this project's document status"
- "Fill in the PL form based on the CI"
- "Export this project's data to Excel"
Detailed feature guide: Lyra Interactive Features Guide
1. Opening the Project Dashboard
If you see "Project not found" or "Project not found or access denied" — you are not a member of that project, or your access was revoked. Ask the person who created the project to add you as a member or send you a share link. If you arrived from a link or a typed address, look for the project again in the project list — it may have been moved to the Archived tab.
If your screen looks different from your partner's — that is normal. The same project is shown from each party's own perspective.
How the screen differs by role
| Your role | Dashboard you see | Counterparty shown on the KPI card |
|---|---|---|
| Seller · Seller's Forwarder | Seller dashboard | Buyer |
| Buyer · Buyer's Forwarder | Buyer dashboard | Seller |
2. Page Header
The top of the screen displays the project's basic summary information.
- My position: Next to the page title ("Project Detail") you see your side and work role in this project, e.g.
Importer side · Approver, with· Owneradded if you own the project. It appears on every project tab (Documents, Tasks, Parties, ...). → Member roles and the project owner - Expected period: Expected start date ~ end date (shown only when set)
- Member chips: Project members are shown with an initial avatar + name (exporter side → importer side → forwarders, approvers first). Click a chip to see their side, role and email, and open a 1:1 chat right away. Beyond five people the rest collapse into
+N, which takes you to the Parties tab.Side Avatar Color Seller Blue Buyer Teal Seller's Forwarder Orange Buyer's Forwarder Purple
3. Trade Timeline (Milestone Track)
The Trade Timeline card has two rows.
- Top row — default trade steps ✨ NEW: all default steps of a trade in their usual order (RFQ → Quotation → PO → PI → … → ETD → ETA; 14 for the Seller, 13 for the Buyer), spread evenly regardless of dates. A step stays in the top row even once it has a date; progress is shown by color (see "Top row — reading progress by color" below).
- Bottom row — scheduled items: tasks and default steps that have a date, placed at date-proportional positions. A dated default step stays in the top row and is also drawn on its date in the bottom row. Items on the same date share one marker, and the blue progress line runs up to today.
🖼️ Screenshot Trade Timeline — top row (all default steps · finished steps gray · in-progress half circle) and bottom row (dated steps and tasks)
Bottom-row markers:
| State | Display | Description |
|---|---|---|
| Done · actual date | Blue down-triangle | Finished task, or a step that actually happened |
| In-Progress · Review | Blue marker + bounce animation | Task currently under way |
| To Do (past due) | Red marker + pulse animation | Overdue task |
| To Do (not yet due) | Gray marker | Task not started yet |
| Planned | Hollow circle | Step with only a planned date (e.g. planned ETD). A red outline means the planned date has passed |
Top row — reading progress by color ✨ NEW (2026-10)
Each step in the top row looks like this, depending on its date and document status.
| State | Display | When |
|---|---|---|
| Done | Circle, number and name in gray | An actual date that is today or has passed (for document steps, the owner side's approval date goes in as the actual date). Without a date: the document is approved |
| In progress | Left half of the circle gray | The date hasn't come yet (a planned ETD is in progress until that day). Also a step whose planned date has passed — if it really happened, click the step and switch it to actual (the bottom row shows it as delayed). Without a date: the document is in progress (draft) |
| Not started | White circle with the kind-colored outline | No date and no document yet |
| Not applicable | Dashed circle + name struck through | Steps marked Not applicable |
- The top-row line is painted blue from the first step up to the last finished step.
- A document's status (in progress · approved) now shows as the circle's color. The small dot that used to sit on the circle's top right is gone; hover over a step to see the document status in words.
Default trade steps ✨ NEW
💡 Who uses this? Both Seller and Buyer. You see and edit only your side's steps. Shared steps such as Quotation, PO, PI, ETD and ETA show the same date to both sides. View-only roles can only look.
| Seller steps (14) | Buyer steps (13, draft) |
|---|---|
| RFQ · Quotation · PO · PI (shared) | RFQ · Quotation · PO · PI (shared) |
| Cargo ready (Seller only) | Import requirements |
| Freight quote request | Freight & insurance |
| CI/PL & shipping docs | Shipping docs received |
| Shipping Request · Export declaration | ETD · ETA (shared) |
| Cargo Closing · Document Closing | Import declaration · Clearance & duties |
| B/L issued · ETD · ETA (ETD·ETA shared) | D/O & release · Receipt & inspection |
Circle colors show the kind — yellow = document, green = production, cyan = shipping, purple = customs.
Click a step to open its editor.
- Pick a date, choose Planned / Actual and Save — the step is also placed on that date in the bottom row, and in the top row it turns in progress before that day and done on or after it. A future date is set to Planned automatically.
- For a document step you see its status (none · in progress · approved). If your side creates it, use Create …; if it exists, Open in Documents. It's created the same way as "documents not yet created" in the Documents tab.
- For a step this trade doesn't have, use Not applicable — it stays in the top row dashed and struck through, and you can Include again any time.
Automatic dates, transport and display
Dates recorded automatically — when a document gets its owner-side approval, that day goes into the step (only if the step has no date yet).
| Step | Recorded when |
|---|---|
| RFQ | The buyer requested a quote from your store |
| Quotation · PI · CI/PL · B/L | The Seller approves that document (CI/PL: whichever is approved first) — the date where the approver is |
| PO | The Buyer approves the PO |
- Canceling the approval clears a date that came from the approval. Dates you entered yourself stay as they are.
- Other dates (cargo ready, closings, ETD, ETA…) are yours to set. Shipment dates written in documents and the PO delivery date are only plans, so they aren't filled in automatically — when the ETD editor shows Shipment date in documents, click Use this date to use it as the planned date.
Transport and display — top right of the card
- Transport · Not set / Sea / Air: change it any time. Not set is shown as sea freight. With Air, Document Closing disappears, B/L becomes AWB issued and Cargo Closing becomes Cargo cut-off.
- ⋯ → Hide / Show default steps: hide them for projects that aren't trades.
ℹ️ The same steps also appear in the Documents, Production, Shipping and Customs folders of the Tasks tab; a date set in either place updates both.
ℹ️ Cargo ready is visible to the Seller only. If you don't produce the goods yourself, use the purchase or warehouse-in date — the Buyer doesn't see it.
4. KPI Cards (4)
Four cards representing the transaction's core metrics are displayed in the center of the page.
| Card | Displayed Content | Notes |
|---|---|---|
| Counterparty | Counterparty name and role | Seller view: shows Buyer / Buyer view: shows Seller |
| To-do ✨ | What to do now — unfinished tasks from the Tasks tab and the follow-up checklist, most urgent first | Formerly the Progress card. The first five, then + N more expands — see below |
| Payment ✨ | Trade amount + the payment terms as written + payment milestone list (add, edit, delete) | Installments past due and not yet received are red — see below |
| Reports ✨ | Latest Import Preparation Check (IPC), Import Readiness (IRR), L/C review (LEO) and Presentation Readiness (PRR) results | Click a row for the result window; View All opens the Reports tab in Documents |
ℹ️ Reports card ✨ (2026-10) — one row per report you have run, in workflow order (IPC → IRR → LEO → PRR). A run still in progress shows an in-progress badge. Clicking a row opens the same result window as the Reports tab in Documents on top of this screen, and what the buyer can see is the same as on that tab (e.g. IPC only after the quotation behind it has been shared with the buyer).
Payment Card Details ✨ NEW
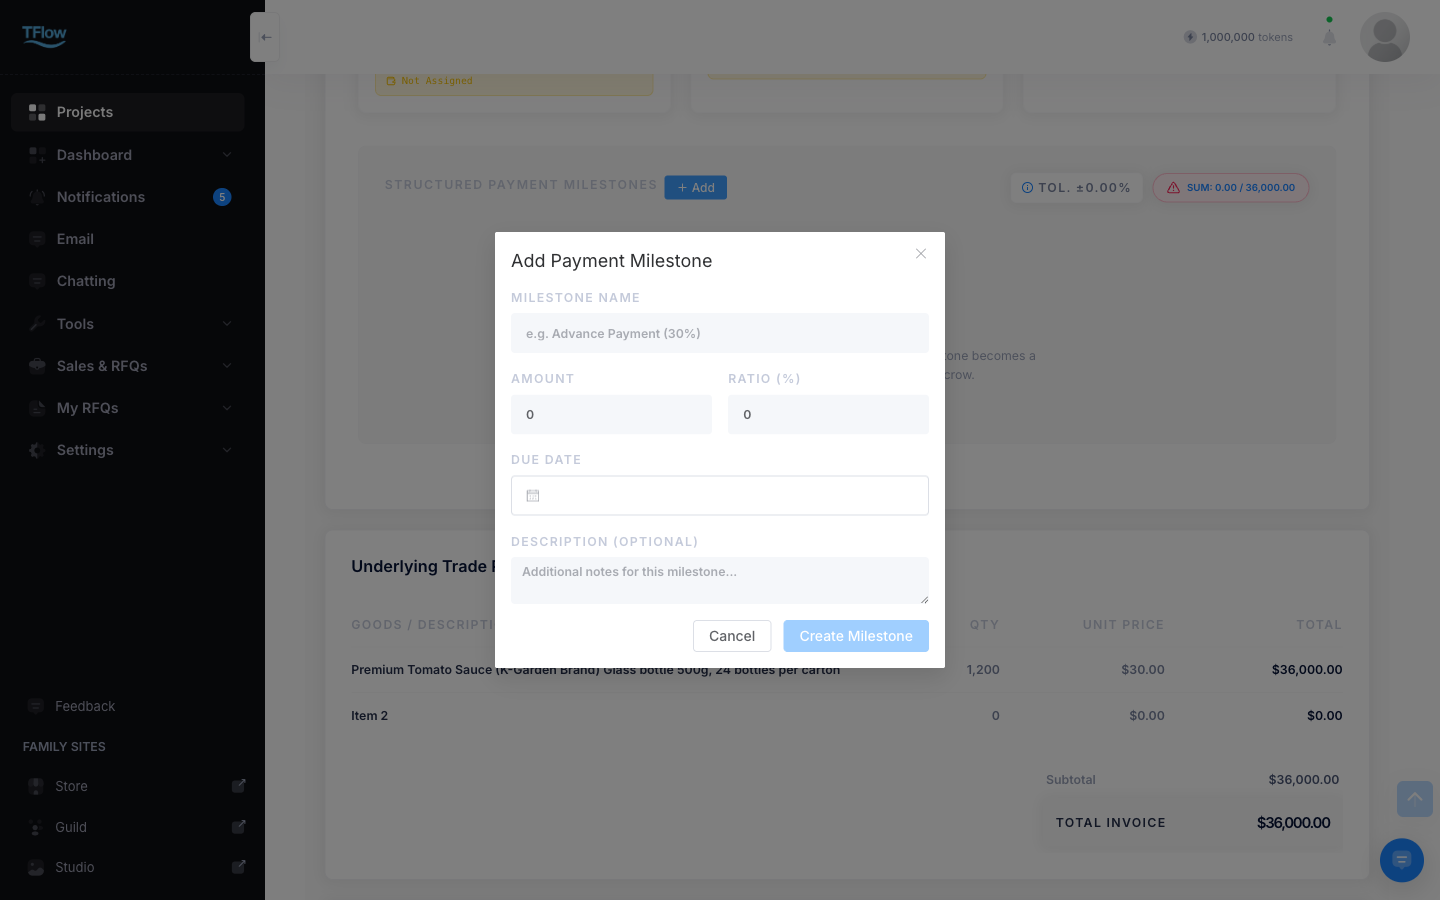
You can add, edit, and delete payment milestones (installments) right inside the Payment card.
- Trade amount: the trade amount is shown at the top of the card, with the total of the installments on the right. Incoterms are shown on the Trade Summary card below.
- Payment terms as written ✨ (2026-10): between the trade amount and the list, the payment terms from your documents (payment method and timing on the quotation or PI, etc.) appear as written, up to two lines — e.g. "T/T 30% in advance, 70% against copy of B/L / Advance : within 7 days after PI date …". If it is longer, More shows it all and Less folds it again.
- Payment list: each installment shows its name, payment method, amount, status (PLAN · PENDING · PAID), ratio and due date. An installment past its due date that is not PAID yet is shown in red ✨ — hover to see "Past due and not yet received".
- + (Add Payment) at the bottom of the card → enter the payment method (T/T / L/C / D/P / D/A / Escrow / O/A / CAD), status, name, amount, currency, ratio, due date and description.
- Use the ✏️ edit / 🗑 delete icons on each installment to change or remove it. Installments that come from escrow are not edited here.
- A milestone whose payment method is set to Escrow also appears with the same details on the 3.2. Token Escrow screen.
Tasks and payment status change together ✨ NEW (2026-10)
💡 Who uses this? Sellers and buyers who registered payment installments from AI suggestions and put the per-installment to-dos (seller "Confirm … received" · buyer "Remit …") on the schedule.
| When you… | The payment status… |
|---|---|
| (Seller) mark the "Confirm … received" task as done | That installment becomes PAID |
| (Seller) undo that task's completion | PAID is cleared — PENDING if the due date has passed, otherwise PLAN |
| Set the installment to PAID in the Edit Payment window | The seller's "Confirm … received" task is marked done too |
| Change it back from PAID in the Edit Payment window | That task is reopened |
| (Buyer) mark the "Remit …" task as done | Stays as it is — the seller side gets a "Remittance marked as sent" notification. The seller checks the receipt and then updates it |
- Only installments registered from AI suggestions and their tasks are linked this way. For installments you added yourself, change the status in the Edit Payment window.
- Escrow installments (TUS, etc.) follow the escrow status, so tasks don't change them.
Past-due installments — set to PENDING every day ✨ NEW (2026-10)
Every day at 9:00 a.m. Korea time, installments past their due date that are not PAID yet are set to PENDING and both sides are notified.
- In-app notification "Payment past due": goes to every member on both the seller and buyer sides — the seller is asked to check whether the money has arrived, and the buyer is told the remittance is past due. Clicking it opens this project's Overview.
- Email: goes to the approvers on each side (owner and approvers).
- Each installment is notified once per due date. If you change the due date, you are notified again once the new date has passed.
- The red color on the card is worked out separately, by comparing the due date with today each time you open the screen.
- Escrow installments and archived projects are not changed.
To-do Card — what to do now ✨ NEW (2026-10)
The former Progress card is now To-do. Instead of a percentage and a progress bar, it shows what needs doing now, most urgent first. It is the same for sellers and buyers.
- What goes in: tasks from the Tasks tab (all unfinished ones) and the to-dos on the checklist of follow-ups found in your documents' payment terms. Default trade steps are not included — they are in the Trade Timeline right above.
- Order
- Items with a date — overdue ones first in red (
2 days overdue), then the nearest (Today,Tomorrow,3 days left; anything more than a week away shows its date). On the same day, High priority tasks come first. - Items without a date — things to check →
Date pending(waiting for a reference event; hover to see the basis, e.g. "7 days after PI issue") →Anytime.
- Items with a date — overdue ones first in red (
- At first only five are shown; + N more expands the full list in place and Show less shrinks it again. Click a row to open the Tasks tab.
- If there is nothing to do, you see "Nothing to do".
🖼️ Screenshot The Overview To-do card — five rows, most urgent first, and + N more
5. Bottom Three-Column Section
Below the KPI cards, three information sections are displayed side by side.
- Trade Summary — key cargo and shipment information such as Incoterms, ETD, ports of loading/discharge, final destination, vessel, and forwarder
- Shipping Documents — the same document rows as the Documents folder on the Tasks tab (existing documents, next documents, documents not created yet) and their status
- Recent Activity — the recent activity history inside the project
Trade Summary
Check key cargo and shipment information at a glance.
| Item | Description |
|---|---|
| Incoterms | Incoterms condition (e.g., CIF, FOB, EXW) |
| ETD | Estimated Time of Departure |
| Port of Loading | Port of loading |
| Port of Discharge | The port of discharge only — the port or airport where the cargo is unloaded |
| Final Destination ✨ | The Destination on the quotation or PI (delivery place or country). Shown only when it has a value |
| Vessel | Vessel name |
| Forwarder | Forwarder contact (shows Not assigned if unset) |
- ✨ (2026-10) The Destination on a quotation or PI often holds a delivery address or a country rather than a port, so it is shown on its own Final Destination row instead of being mixed into the port of discharge.
- Details at the top right of the card opens the Common data details window — the basic trade information that this project's trade documents share (trade & shipping terms, payment terms, etc.). It also lists the port of discharge and the final destination separately.
Shipping Documents
✨ (2026-10) Shows the same rows, by the same rules, as the Documents folder on the Tasks tab. It is the same for sellers and buyers.
| Row | What you see | When you click it |
|---|---|---|
| A document in Documents | Name · type · status | Opens that document in Documents (one still being classified, or that failed, opens the list) |
| Next document — the previous one is approved by both sides | Next step badge | A confirmation, then the document is created right there |
| Required document not created yet | Dimmed · Not yet badge | A confirmation, then the document is created right there |
| A needed document accepted from the IPC | Dimmed · Upload needed badge | The Docu Box upload window — upload it once issued and it drops off automatically |
| A document step with no in-app template (B/L · Shipping Request · Export declaration, etc.) with no document yet | Dimmed · Upload needed badge | The Docu Box upload window. A B/L drops off once uploaded; a Shipping Request or Export declaration isn't linked to its step when uploaded, so it drops off once you set an actual date in Trade Schedule (dates are set in Trade Schedule) |
- The status column follows the same rules as Documents and the Tasks tab — trade documents created in the editor (QT, PO, PI, CI, PL) show Drafting → Completed (completed once the owner side approves: the buyer for a PO, the seller for the rest), uploaded documents show Analyzing · Analyzed, and a failed one shows Failed.
- Next-document and not-created-yet rows appear when you have edit permission, and are created the same way as in Documents.
- The type column uses abbreviations (
CIPLBLAWBCOOCOIPIPOQTRFQ); other documents (Health Certificate, etc.) show their name as is.
Recent Activity
Project comments are shown newest first; scroll down to load older comments.
- Activity time is shown relatively:
just now,X hours ago,yesterday, or an exact date - Import Readiness (IRR) results are shown on the Reports tab above.
6. Project Navigation Menu
Through the navigation menu at the top of the page, you can move to the project's sub-sections.
- Calendar: Manage schedules, Gantt chart, and the task status board → Guide
- Documents / DocuBox: Upload and manage trade documents → Guide
- Freight & Insurance: Cargo transport and insurance information → Guide
- Payment: Payment and escrow status → Guide
- Comments / Parties: Manage mention comments and external share links → Guide
- The number next to "Tasks" ✨: the follow-ups waiting for your decision (suggestions + changes to review). → Follow-ups
💡 Troubleshooting (FAQ)
What you see on screen
- Q: "My screen looks different from my partner's (counterparty's)."
- A: This is normal. Because TFlow provides a role-based dashboard, Seller and Buyer view the same project from their own perspectives. You can check the counterparty's information in the "Counterparty" item of the KPI cards.
Trade Timeline and shipping documents
- Q: "A milestone is blinking red."
- A: A milestone whose due date has passed while its status is still To Do is shown as overdue. Change that task's status to In-Progress or Done in the Calendar tab.
- Q: "Steps keep staying in the top row of the Trade Timeline." / "I set a date, but the step is still in the top row."
- A: That is expected. ✨ (2026-10) The top row always shows every default step; progress is shown by color (finished = gray, in progress = left half gray, blue line up to the last finished step). Dated steps are also drawn in the bottom row.
- A step that isn't gray yet either has a date still to come or has no date and a document in progress. Click it to set a date — Quotation, PO, PI, CI/PL and B/L get the date when the owner side approves. Mark steps this trade doesn't have as Not applicable.
- Q: "I wrote a shipment date in a document, but ETD wasn't filled in."
- A: Shipment timing in a quotation or PI and the PO delivery date are plans, so they aren't put into the Trade Timeline automatically. Click the ETD step: it shows Shipment date in documents, and Use this date sets it as the planned date.
- Q: "Documents are not showing in Shipping Documents."
- A: This list is the same as Documents and the Documents folder on the Tasks tab. Upload or create a document in the Documents tab and it shows up right away. Required documents not created yet appear as dimmed rows — click one to create it right there (when you have edit permission).
Payment card
- Q: "An installment in the payment list is red."
- A: It is past its due date and not PAID yet. If the money has arrived, change its status to PAID with the ✏️ edit icon, or — for an installment registered from AI suggestions — mark the seller's "Confirm … received" task as done. → Tasks and payment status
- Q: "I marked the task as done, but the payment status didn't become PAID."
- A: Only the seller's "Confirm … received" task for an installment registered from AI suggestions is linked. The buyer's "Remit …" task doesn't change the payment status; it only notifies the seller. For installments you added yourself, change the status in the Edit Payment window.
- Q: "The status turned PENDING even though I didn't change it."
- A: Installments past their due date that are not PAID are set to PENDING automatically every day at 9:00 a.m. Korea time, and both sides get a "Payment past due" notification. → Past-due installments
Status changes and inviting members
- Q: "I get an error when trying to change the status to Done."
- A: Check the
Documentstab to make sure the required shipping documents are not missing. If you see the message "Cannot close project without confirmed shipping documents," register the documents and try again.
- A: Check the
- Q: "The project won't open — it says 'Not a project member' or 'access denied'." / "Can't I invite an external partner company to the project?"
- A: If you are the one trying to get in — you are not a member of that project yet, or your access was revoked. Ask the person who created the project to add you as a member or send you a share link.
- If you are the one inviting — as a rule, external accounts get read-only access through a secure link in the Parties tab. To grant edit permission, register the person in My Friends first, then add them as a project member.
- Q: "Can I set the status to Done and then roll it back to In Progress?"
- A: Yes, you can. You can roll the status back to a previous stage via the Calendar tab or the navigation menu.