Account Management — Profile · Friends · Notifications
This guide covers the three core screens related to your account: My Profile (personal & company info and department management), My Friends (your trade partner network), and the Notification Center (all notifications in one place). You can reach all three screens from the profile menu at the top right or from the left sidebar.
💡 Who is this for? Anyone setting up TFlow for the first time, the company Master organizing company and department information, and anyone who needs to connect with an external partner as a friend before starting collaboration (chat, project sharing). The company information in your profile is automatically filled into many screens such as quotes, payments, and certificates, so it's a good idea to enter it accurately first.
🖼️ Screen capture Top-right profile dropdown menu — My Profile / My Friends / Subscription / Organization / Log out 📍
tflowx.com· Save pathimages/common/account-menu.png
1. My Profile
Access: Top-right profile menu → My Profile (tflowx.com/my/profile)
The profile screen is organized as a series of steps, letting you manage everything from personal information to company, bank, and department details in order.
1-1. Personal Info
- Basic info: Change your avatar (profile picture), set a one-line bio, and choose your display timezone.
- Phone number: Edit and save it directly on the edit screen; changes take effect immediately.
- Language settings: Choose 한국어 or English, and menus, buttons, and notification messages will be shown in that language.
- Change password: Enter your current password, then enter a new password combining letters, numbers, and special characters twice. (Recommended change interval: every 3–6 months.)
🖼️ Screen capture My Profile Personal Info — avatar · bio · language · timezone · phone number · change password 📍
tflowx.com/my/profile· Save pathimages/common/profile-personal.png
1-2. Company Info
Beyond personal information, you manage the company information used for trade operations step by step.
| Step | Contents |
|---|---|
| Step 1 · Basic info | Username, company name, department name |
| Step 2 · Import/Export info | Company contact, address, country, and other trade organization details |
| Step 3 · Bank info | Bank name, SWIFT code, account number, and other payment details |
| Step 4 · Department management | Create departments and manage staff (see details below) |
ℹ️ Organizational information such as company, department, and title cannot be changed by an individual alone; only the company Master can update it. If you need changes, ask your company Master.
1-2-1. Quotation Default Terms
Under the bank info on the Settings > Organization > Basic tab is the Quotation Default Terms card. Write down the terms your company always uses once, and the empty fields of every new quotation are filled with them.
| Field | Example |
|---|---|
| Incoterms · Named place | FOB · Busan, Korea |
| Payment method · Payment timing | T/T · 30% deposit, 70% before shipment |
| Shipment timing (lead time) · Shipment condition | Within 30 days after receipt of deposit · Partial shipment allowed |
| Origin | Republic of Korea |
| Quote validity (days) · Currency | 30 · USD |
| Packing · Notes | Export standard carton · Warranty: 12 months from B/L date |
- When they are filled — When you first open a quotation for a store RFQ, and when you create a new quotation in a project's documents. Quotations already created are not changed.
- What comes first — Terms the buyer wrote in the RFQ, the project's shared info, and values taken from a letter of credit (LC) are used first; only empty fields are filled from the defaults. For example, if the buyer asked for CIF, CIF stays even when your default is FOB.
- Who can edit — Only the company Master can edit; other members can view them. Changes save automatically when you leave a field.
- Put industry-specific terms such as warranty or minimum order quantity in Notes.
1-2-2. AI Processing Level
Below Quotation Default Terms on the Settings > Organization > Basic tab is the AI Processing Level card. It sets, as the company default, how much the AI may handle without asking.
- Cautious — The AI only suggests. You handle everything yourself
- Standard (default, current behavior) — The AI only tidies up using confirmed values (putting to-dos on the schedule once their date is set, completing items whose condition is met, etc.)
- Proactive — The AI also adds the checks and documents it finds to the checklist right away
- At any level, payment plans with amounts and dates, sharing, email and payments are confirmed by you.
- Only the company Master can change it, and it saves as soon as you choose. Projects in progress follow it the next time their suggestions are recalculated.
- Each project can set its own level with the gear on the AI suggestions folder in the Tasks tab → Project Calendar Guide — AI processing level
1-3. Department Management (Step 4)
In Step 4, you create departments within your company and manage the staff in each department.
Add a department
- Enter a department name in the Add Department card at the top and press Enter or Add.
- To add several departments at once, enter them separated by line breaks (one per line).
- Existing department names are checked for duplicates and will not be added again.
Edit department info
- Click a department card to open the slide-out edit panel on the right.
- Editable fields: department name (required), country, state/province, city, postal code, address, detailed address, phone number, fax number.
- The department name can also be edited inline directly on the card.
1-3-1. Department Staff Management
- In the staff-add area at the bottom of the edit panel, enter an email and add it with Enter or Add (separate multiple people with line breaks).
- You can add people who haven't signed up for TFlow using just their email, and they will be linked automatically when they later sign up.
- Use the delete button next to each staff member to remove them from the department.
- A department card shows a preview of up to 5 staff members, with any overflow abbreviated as
+N. - The department manager is shown on the department card; only the company Master can change it.
🖼️ Screen capture Profile Step 4 Department Management — department card list + slide-out edit panel (add staff) 📍
tflowx.com/my/profile· Save pathimages/common/profile-department.png
ℹ️ Company-wide organizational operations such as license assignment and designating settlement managers are handled on the separate Organization screen (
/my/organization). → License
1-4. Activity Log
A summary of the actions you've taken across the system (logins, creations, rejections, downloads, etc.) in projects, mail, payments, and more is displayed here.
1-5. Wallets ✨ NEW (2026-08)
This is where you pre-register the wallets used to pay for trade transactions. Connect via Xaman (phone app · recommended) / Crossmark / GemWallet (beta), and set an alias, choose a default wallet, set up receiving permission, check balances, or disconnect. For details, see the Proof of Funds (PoF) guide. A company wallet shared under your company's name is created not here but on Organization > Settlement tab (company wallets).
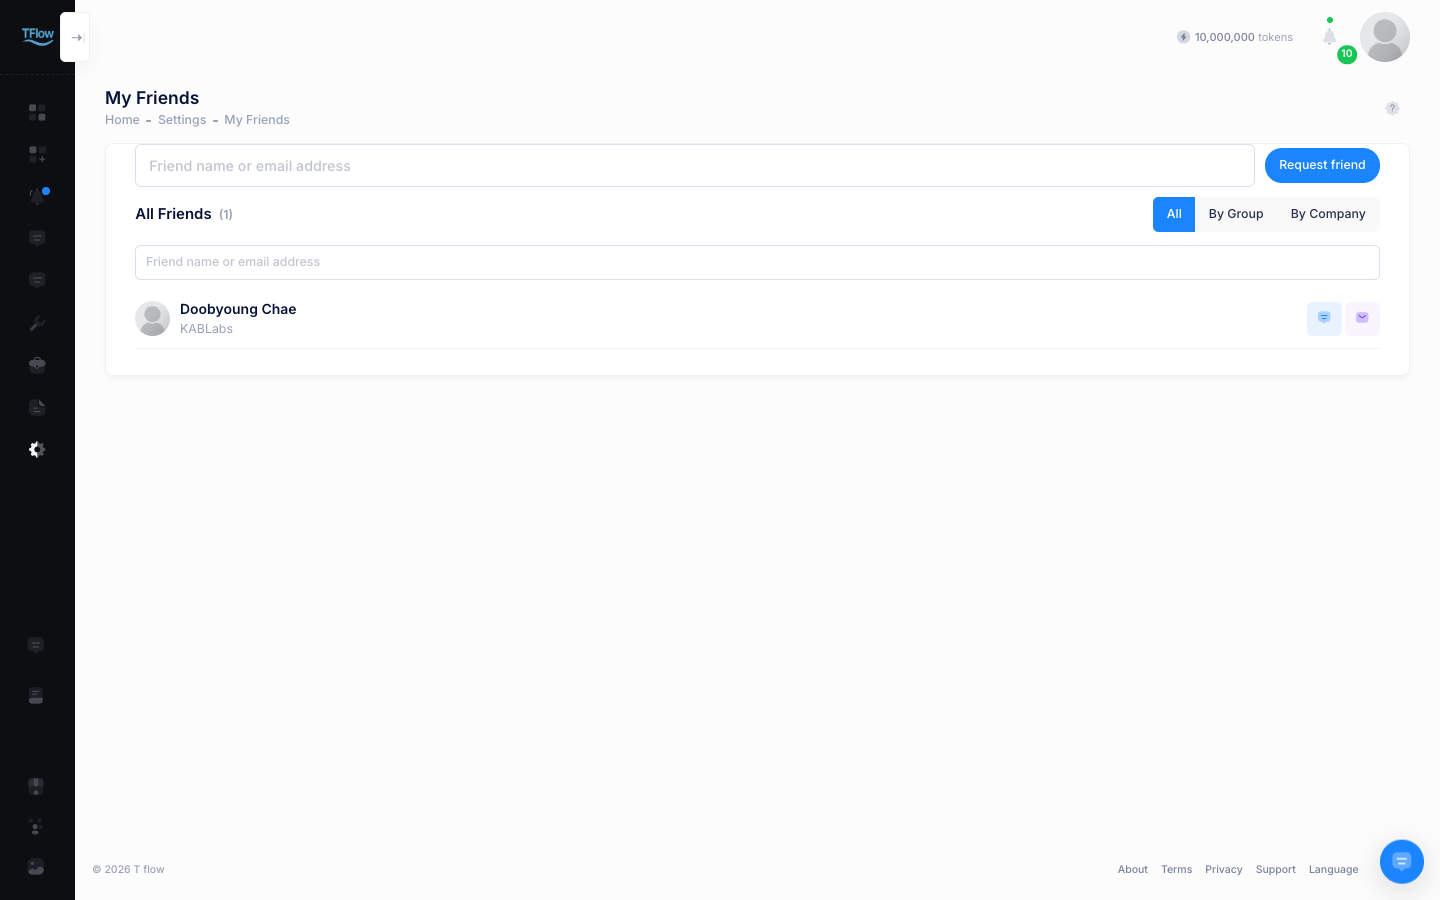
2. My Friends
Access: Top-right profile menu → My Friends (tflowx.com/my/friends)
TFlow is a trade network hub that connects exporters, shipping lines, customs brokers, buyers, and banks. To share projects or invite someone to a group chat, you must first be connected as friends.
- Sending a request: Type a name or email in the box at the top and pick the person from the suggestions, then press Request friend.
- Requests both ways: When someone requests you, a Received Requests area appears above the list so you can accept or decline. Requests you sent sit under Sent Requests as Pending, and Cancel withdraws them. With no requests either way, the area does not appear at all.
- Three ways to view: Pick All · By Group · By Company at the top right of the list. By Group lets you create groups (rename and delete them too) and sort friends into them; By Company groups them by the company they belong to.
- What you can do from a friend card: The icons on the right start a chat or open an email. Clicking the name opens a profile window where you can set an alias, leave a memo, or remove the friend.
3. Notification Center
View and manage all notifications that occur in TFlow (project status changes, document uploads, mentions, incoming emails, etc.) in one place.
3-1. Viewing Notifications
Notifications can be accessed via two paths.
- Bell icon at the top right: The number of unread notifications is shown in real time as a pill badge (up to
99+). The badge disappears once everything is read. Click it to open the Activity Logs panel on the right with your recent notifications. Opening the panel marks all notifications as read, and an "End of new notifications" divider separates the ones that just arrived from those you received earlier. Click View all notifications at the bottom of the panel to go to the notifications screen. - Notification menu in the left sidebar: Takes you to the same notifications screen (
tflowx.com/notifications). When the sidebar is collapsed, the badge is shown as a dot.
ℹ️ To avoid confusion with email, the previous "Inbox" menu name has been changed to "Notification".
Notifications screen
- Grouped by date: Automatically sorted into Today / Yesterday / This Week / Earlier.
- Filtering: Filter using All / Unread only at the top.
- Infinite scroll: Scroll down to automatically load older notifications.
🖼️ Screen capture Notification Center — grouped by date + All/Unread only filter + mark all as read button 📍
tflowx.com/notifications· Save pathimages/common/notifications.png
3-2. Managing Notifications
- Mark individually as read: Clicking a notification automatically marks it as read and takes you directly to the related screen (project, document, email, etc.).
- Mark all as read: Clear everything at once with Mark all as read at the top.
3-3. Notification Types
Notifications are triggered in the following situations. Clicking a notification takes you straight to the screen below. ✨ (2026-10) Store, payment and account notifications continue in 3-3-1.
| Notification | Clicking it opens |
|---|---|
| Project participant added (invitation) | The project |
| Trade document created, updated, approval requested, approved, approval cancelled, shared | The documents screen with that document opened |
| Quotation (QT) exchange — quote sent, counter offer, accepted, etc. | That quotation document, opened |
| Document sharing stopped | The project's document list |
| Document analysis complete | The analyzed document, opened (reference documents open in the Reference (CYGNUS) tab) |
| Document analysis failed | The project's document list |
| Report (IRR · LEO · PRR · DCC) complete or failed | The report |
| Payment past due ✨ — a payment installment past its due date and not PAID yet (daily at 9:00 a.m. Korea time, both seller and buyer sides) | The project Overview (Payment card) → Past-due installments |
| Remittance marked as sent ✨ — the buyer marked a "Remit …" task as done (received by the seller side) | The project Overview (Payment card) — check the receipt, then update the payment status |
| Comment / task change | The project's comments / schedule |
3-3-1. Notification Types — Store · Payment · Account
| Notification | Clicking it opens |
|---|---|
| RFQ received (seller) | Received RFQs, with that RFQ's details opened. If that RFQ isn't in the list (deleted, or sent to a different store), a notice tells you so |
| Store inquiry · inquiry reply | The inquiry details (on the seller's or buyer's own screen) |
| Freight quote received (shipper) | The project's freight & insurance screen |
| Freight quote request · quote selected (forwarder) | The quote requests screen in the forwarder portal |
| Fund verification request (the counterparty requests PoF/FCL verification) | The project's payment screen — the Verification (Issue) tab for buyers, the Verification (Request) tab for sellers |
| Subscription payment succeeded | The receipt for that payment |
| Subscription payment failed · cancelled · refunded | Subscription management |
| Not enough license seats ✨ (company Master) — no free seat was left for someone who accepted an invitation | Subscription management → Automatic assignment on joining |
| Tokens exhausted | The token top-up window |
| Friend request | My Friends — received requests |
| New email | While unread, new emails collapse into one line that updates as "X and N more" — opens the mailbox for several emails, or the email itself for one. Once read, the next email starts a new line. No phone push |
| Important email ✨ — emails the AI reads and rates as highly important (ads and newsletters excluded) | The email. Sent one per email, with a summary and the to-do item. Phone push only for trade emails (inquiries, quotes, orders, L/Cs, shipments, payments, customs, etc.) |
3-4. Web Push Notifications
You can receive important notifications on your desktop or mobile even when your browser or app is closed.
- While logged in, your browser displays a "Do you want to allow notifications?" popup.
- Press Allow to enable Web Push.
- From then on, notifications will arrive even when the browser is closed.
- When you're viewing a TFlow screen: Shown as a real-time badge within the screen.
- When you're not viewing it: Delivered as a Push notification to your OS notification center (desktop) or notification bar (mobile).
- Clicking a notification: Takes you directly to the relevant TFlow screen.
ℹ️ ✨ (2026-10) RFQ, inquiry, freight quote, report (IRR · LEO · PRR · DCC) complete/failed and subscription payment notifications now arrive in the bell drawer right away, without refreshing — as a toast while you're looking at the screen, and as a Web Push when the app is closed. While you're on an inquiry, email or receipt detail screen, clicking another notification opens that new item.
ℹ️ Using it together with the install-as-an-app method (PWA) makes Push notifications arrive even more seamlessly.
💡 Troubleshooting (FAQ)
Profile and departments
Q. I can't change my company department or title. A. Organizational information (department name, title, employee ID) can only be updated by the company Master. Ask your company Master to make the change.
Q. Can I add someone who hasn't signed up for TFlow as a department staff member? A. Yes. Just enter their email to add them, and when that person later signs up, their account is linked automatically.
Q. A staff member I added to a department doesn't appear in the list.
A. A department card shows a preview of only up to 5 people, with the rest abbreviated as +N. Click the department card to open the edit panel and see all staff members.
Q. A specific user doesn't show up when inviting project collaborators or in group chat. A. External users such as employees of other companies must first be approved as friends in your My Friends list before project sharing and invitations are possible. Start by sending a friend request and get mutual approval.
Notifications and your account
Q. I'm not receiving notifications. A. Check whether notification permissions for the TFlow site are blocked in your browser settings. In Chrome, you can change it to Allow via the lock icon on the left of the address bar → Site settings → Notifications.
Q. The notification badge count is different from the actual number. A. Refreshing the page (F5) brings it up to date. If it stays out of sync, please log out and log back in.
Q. I want to close my account. A. For trade continuity and information security, users cannot delete their account on their own. Ask your company Master to go through the procedure to deactivate the account.
Q. I can't log in — it says "This account has been suspended." A. Your company Master or TFlow customer support has suspended the account. Ask your company Master to check, or contact customer support. Your data is not deleted.